Like macro photography? For me if I am not going out birding I'll do macro. At least I can utilise my camera and learn new things. Ampang and Kuantan got abundance of locations to do macro. Also Ampang and Kuantan are great for birding too.
How to edit a macro image from an original photo A into photo B as belows...? Please bear in mind this photo is not a good composition. Spider's legs are not fully captured, blocked by the leave's edge... sigh.
 |
| Photo A : RAW image without any processing done
|
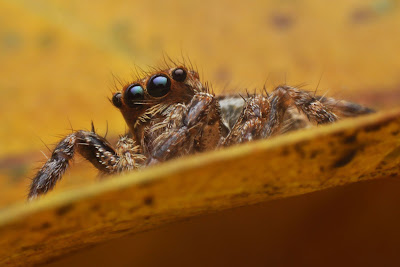 |
| Photo B : Processed using Photoshop CS4 |
Firstly, as shown below, open the file in CS4. If you are using RAW file then convert to TIFF and do the editing in image mode of 16 bits/channel. Then copy the background. Remember not to crop your photo prior to your editing. Somehow there would be quite a major degrade in image quality if you first crop your photos before start the editing process.
Then sharpen the image. I will usually sharpen only the area that I need to sharpen, or also known as selective sharpening. Very seldom that I sharpen the entire image. In CS4 you can use brush tool to select area that you want to sharpen. I'll show how...
In this case I am using third party sharpening tools, Nik Sharperner 3.0 CS4 plug-in filter to sharpen areas. You can also use unsharp mask filter or high pass filter. These are sharpening tools which are provided in CS4.
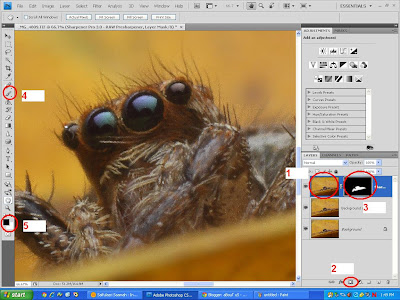
First, sharpen the entire image, as shown above as thumbnail 1. As you are highlighting the sharpening layer (notice the thumbnails background is in blue colour), click on the "add layer mask" button shown above as label 2. The layer mask will be added beside the thumbnail shown above as label 3. To erase the sharpening effect on the area that you do not want to sharpen i.e the rest of the image except on the spider area, click the brush tool shown above as label 4. Make sure the small black square in label 5, is on top of the white square when you click on the brush tool. It is indicating that you are brushing off the effect (sharpening) that you do not want. If white square is on top of black squre it means the other way around, which is to reinstate the sharpening effect. You can click on the small arrow on top of the two small squares to toggle between black and white. After everything done, you can see the layer mask (label 3) will turn black on the background (sharpening effect removed) and the spider will remain white (the area which have been sharpened).
Then apply selective contrast and brightness adjusment as below. Remember to add the layer mask and use the brush tool the same way again as we used it in the earlier step for selective area sharpening. CS4 brush tool is really a very powerful tool in editing.
After that adjust the highlights and shadows. There are many ways you can edit the highlights and shadows. I normally use curve adjustment. Click on the finger icon as circled below. Then adjust the highlights or shadows as per your preference. Then add a layer mask and again by using brush tool you can do selective adjustment of highlights and shadows to certain area depending on your liking. In this case I highlighted the shadows below the spider's eyes area which I feel it is a little under exposed. See below image.
Lastly flatten all layers to make them come into effect and then crop the image according the rules of third if applicable. And save it in mode 8 bits/channel jpeg file.
Now you know how to process this image :
Into something like this :
Of course there is always another way to process or edit photos. This is only one of the editing method that I found out to suit my own preferences... : ) Cheers!!


